192.168.1.1 is a private gateway IP that opens your router’s admin page. From here you can change Wi-Fi name/password, secure the network, manage devices, and adjust LAN settings.
People also type 19216811 or 192.168.l.l. The correct address uses the number 1 four times: 192.168.1.1.
Note: It works only when you’re connected to that router’s Wi-Fi or Ethernet. You can’t access 192.168.1.1 from the public internet.
How to login to 192.168.1.1?
- Connect to the router Wi-Fi/Ethernet.
- Type https://192.168.1.1/ in the address bar.
- Enter the admin username and password.
- You will be logged into the admin panel of your router.
If the page won’t load, don’t type it in Google search. Try https://192.168.1.1 and confirm you’re not on mobile data or a different Wi-Fi network. Find your router’s IP address, or try another common address such as 192.168.0.1 or 10.0.0.1.
Forgot IP Address Username and Password?
If you have forgotten the IP Address Username or Password, you can:
- Check router label, box, manual, or default username and password list.
- Find the default IP, username, and password.
- If details fail, do a factory reset.
- Locate the small RESET button.
- Hold it 10 to 15 seconds with a pin.
- Router restarts with default settings.
Default Username and Password
The routers are usually configured with a default username and a default password. Such information is usually printed on a label on the back or bottom side of the router.
Common default combinations include:
- Username: admin
- Password: admin
- Username: admin
- Password: password
When they fail, consult the manual of your router or visit the website of the manufacturer to get the appropriate login credentials.
How to Change Your Router IP Address
Your router IP address (default gateway) opens the router admin panel. Common defaults are 192.168.1.1 and 192.168.0.1.
Before changing it, save your current settings. After the change, the router usually reboots, and you must log in again using the new IP address.
Use a private IP range only, such as 192.168.x.x or 10.x.x.x. Do not use an IP already assigned to another device.
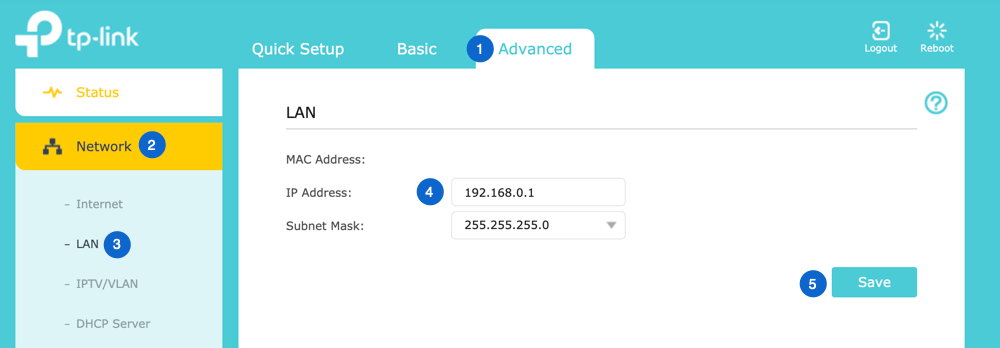
TP-Link
- Open your browser and log in at 192.168.1.1 or 192.168.0.1. Enter your admin username and password.
- Go to Advanced > Network > LAN. Find the IP Address field.
- Enter your new router IP, such as 192.168.1.2. Click Save.
- The router will reboot. Reconnect, then open the admin page using the new IP address.
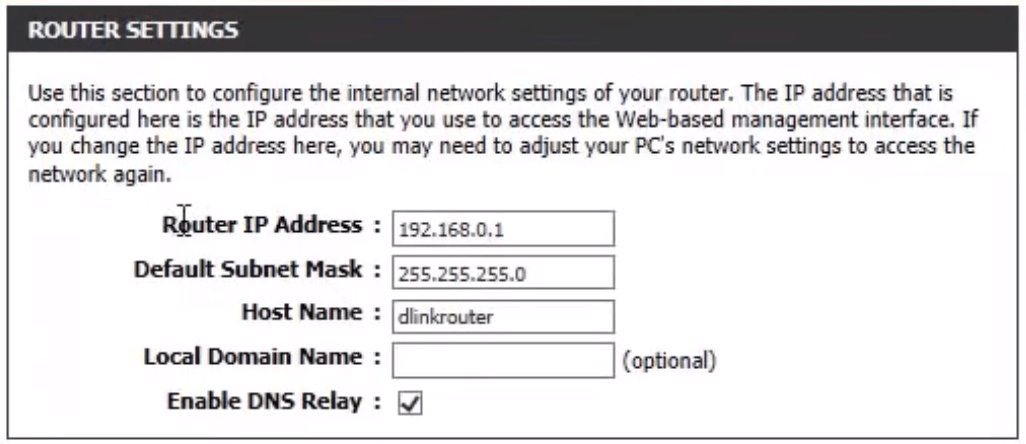
D-Link
- Open the router login page and sign in with your admin details.
- Go to Setup > Network Settings. Find the Router IP Address field.
- Change the IP address as needed, then click Save Settings.
- After reboot, use the new IP address to access the router panel.
NETGEAR Router Login
- Log in using 192.168.1.1, 192.168.0.1, or routerlogin.net / routerlogin.com.
- Sign in with your admin details. Default logins are often admin and password, but your device may be different.
- Go to Advanced > Setup > LAN Setup.
- Under LAN TCP/IP Setup, change the IP Address field, then click Apply.
- The router will reboot. Open the panel again with the new IP address.

If the router becomes inaccessible, restart it first and try again using the new IP.
If needed, do a factory reset using the hidden RESET button. This restores default settings and removes custom changes. You can find a complete guide on how to Secure a WiFi Network by clicking the link.
Quick Tasks Inside the Admin Panel
- Change Wi-Fi password: Wireless/Wi-Fi > Security > Password/Key > Save.
- Change Wi-Fi name (SSID): Wireless/Wi-Fi > SSID/Network Name > Save.
- Block a device: Clients/Connected Devices > select device > Block/Blacklist.
- Change router IP: Network/LAN > Router IP > Save, then reconnect using the new IP.
What you can change in the admin panel
- Wi-Fi: SSID, password, guest network, WPA2/WPA3, and WPS.
- Network: DHCP, LAN IP, port forwarding, parental controls, QoS, and firmware updates.
192.168.1.1 not working?
Your router may use 192.168.0.1, 10.0.0.1, or 192.168.1.254 instead. Always confirm the correct IP using your device’s Default Gateway/Router field.
Still stuck? Reboot the router, try another browser or device, turn off VPN/proxy, and confirm you’re connected to the router network (not a range extender).
Additional Help
In case 192.168.1.1 is not working with your router, use other default gateway addresses that include: 192.168.0.1, 192.168.1.254, 192.168.100.1 or 10.0.0.1.
You may also refer to the instructions of your router model or to the official support site of your router model.
Learning about how to access and use your router settings would provide you with a greater level of control over your own internet connection and could help prevent attacks on your home network.
Related Router Login Guides
Need brand specific steps or your default IP and password? These pages cover every major router.
Thanks for your feedback!
Sorry about that. Tell us what was missing and we will fix it.