How to Login into 192.168.1.1?
Follow these simple steps to login into 192.168.1.1,
- First, open a web browser.
- Type http://192.168.1.1 or enter 192.168.1.1 into the browser’s search bar.
- Now, a login panel will appear.
- Here, you need to enter the router’s login username and password.
- Once you have entered the details correctly, you will be logged in into your router Admin Panel.
If you are not able to get to the router’s admin panel at 192.168.1.1, try a different IP address – 192.168.0.1, 192.168.100.1 or 10.0.0.1. If you are not sure about your router’s default IP address, check here to your router IP address. You can also read our tutorial on how to find your router’s IP address for more help.
Note: If you are not able to find your Router’s IP address, check here to find your router’s IP address. Also, check here for more default router IP addresses.
Forgot Router IP Address Username and Password?
You are not able to login to the router admin panel with your Router IP Address Username and Password. Then follow the steps below,
- You can find the router’s default username and password inside the user manual or in the back of the router.
- You can check the router default username and password list here.
- In case, you have changed the password, forgotten it, or have lost it. Then, you need to factory reset your router.
- To reset your router to the default factory setting, look for the small hidden reset button at the back of your router.
- You need to hold that button for a minimum of 10 to 15 seconds. You may use a needle, pen, or toothpick.
- The router will reboot itself back to the default factory settings.
- Now, you can enter the default address 192.168.1.1 in order to login to your router admin panel using the default username and password.
How to find your router’s IP address
You are not able to access your router at 192.168.1.1. You could be using another IP address such as 192.168.0.1, 10.0.0.1. You can check your router IP address on the back sticker. check our guide to find your router’s IP Address. You can also check the default router IP address list to find your router’s IP address.
How to Configure Your Router in a Few Simple Steps
It is important to setup your router property to enjoy a stable network. Following these simple steps to setup your router.
- Connect your router to your computer and your modem.
- Open your web browser and type router’s address 192.168.1.1 or 192.168.0.1. The IP address varies a bit by manufacturer ( and avoid misspell such as 192.168.l.l ).
- Login to your router admin panel using the default username and password.
- “admin” is one of the most common default usernames. “password” is the most common default password. check the router’s default username and password list.
- Now, you can set a new username and password, and configure your wireless network settings.
Troubleshooting 192.168.1.1
If you are not able to connect to your router’s default gateway IP address. It could be follow reasons.
Connected to your device
Router need to be connected to your device via etherner cable or WiFi connection.
Rebooting your router
Rebooting is effecting option to troubleshooting your router. First, unplug the router and modern. Then, reconnect it after couple of minutues.
Avoid Misspelling your gateway IP
Type 192.168.1.1 in the address bar in your browser instead of 192.168.l.l. If none of these helped you, then you need factory reset your router.
How do I Change My Route IP Address?
Before we go explain how to change the router default gateway IP address. We need to know the difference between public and local IP address.
The public IP address is pre-assigned to you by your internet service provider. You typically have no control over it. ISPs provide static or dynamic IP address to the customers. The dynamic IP address changes from time to time on its own.
On the other hand, the local IP address is assigned to your router. You can change it to prevent others from accessing your admin panel, DDoS attacks, etc. This way it adds an additional layer of safety and protection. This is how to do it on TP-Link routers,
TP-Link
- Type 192.168.0.1 or 192.168.1.1 at the URL bar in your web browser.
- Now, login to your default admin panel (admin is username and password is password).
- Go to Advanced Settings> Network. Then, choose LAN.
- Now, look for the “IP Address” field.
- Type in the router’s new IP address in the “IP Address” field.
- You may change it to your desired address such as 192.168.1.2 or something else.
- Now, click on Save.
- The router will reboot to apply the changes.

- After changing your router’s IP address, you will no longer be able to access it using the old address.
- The new IP address you need to remember in order to login to the router admin panel next time.
Asus
- Open a browser from your device.
- Type 192.168.1.1 or router.asus.com in the address bar.
- Type the username and password to login to the router admin panel.
- Go to LAN option under the Advanced Settings.
- Now, view the IP address field under LAP IP to check your current router IP address.

- Enter your new IP address in the field and click on Apply to save settings.
Linksys
- Open your Linksys router’s web interface.
- Go to Configuration > Connectivity > Local Network.
- Type your new IP in the IP Address field.
- Now, click on save.
D-Link
- Go to your favorite web browser
- Enter your router’s IP address
- Login with the default username and password.
- Now, click on Setup.
- Choose Network Setting Option.

- Type your desired IP Address in the Router IP Address field.
- Click on Save settings.
NETGEAR
- Launch an Internet browser from your computer or the device that is connected to the router.
- Type 192.168.1.1 or 192.168.0.1 or http://www.routerlogin.net or http://www.routerlogin.com.
- A login screen will display.
- Enter the default username and password.
- The username is admin and the default password is password ( the username and password are case-sensitive).
- Once you logged in, basic home screen display will come.
- Select ADVANCED > Setup > LAN Setup.
- Find the field labeled IP Address under the heading of TCP/IP Setup.
- Enter your new Router IP Address in the field. It is a good idea to end this address in a 1 for easier recall in the future.
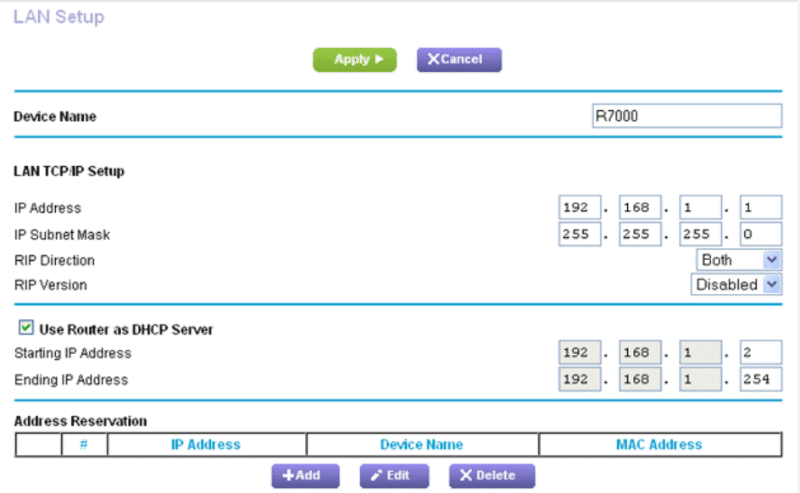
- Don’t make any other changes on this page.
- Click the Apply button and your changes will be saved.
If anything goes wrong while setting up, You may factory reset your router settings to revert back all the customization. You can check our guide on how to protect your WiFi network.
It is important to protect your WiFi router to avoid unauthorized access,
- enable WPA2 encryption.
- Use a strong password.
- Disabling WPS adds more security. Because it is an old method of synchronization between networks.
- Enable MAC-address filtering.
- Update your router firmware